背景
最近有个临时任务要将 OSS bucket 挂载到云服务器上,这样就可以便捷地操作 OSS 上的对象,实现数据的共享。这里选择了使用阿里云的 ossfs 工具将 OSS对象存储 挂载到 ESC服务器上。
使用
首先查看服务器版本
我们的服务器是 Centos 的,所以会在 /etc目录下有个 redhat-release 文件,打开这个文件可以得知服务器版本是 CentOS release 6.9 (Final),阿里云给出的 ossfs 工具支持Ubuntu 16.04、Ubuntu 14.04、CentOS 7.0、CentOS 6.5四个版本,这里我选择了CentOS 6.5的版本,因为我现在的服务器版本是CentOS 6.9,但还有其它环境的服务器版本是CentOS 7.0以上,而CentOS 6.5的版本大于等于6.5的都可以使用。
下载
cd /usr/local
wget http://docs-aliyun.cn-hangzhou.oss.aliyun-inc.com/assets/attach/32196/cn_zh/1507811607579/ossfs_1.80.3_centos6.5_x86_64.rpm
安装
sudo yum localinstall ossfs_1.80.3_centos6.5_x86_64.rpm -y
但是这个时候报错了:
Transaction Check Error:
   file /sbin/mount.fuse from install of ossfs-1.80.3-1.x86_64 conflicts with file from package fuse-2.8.3-5.el6.x86_64
   file /usr/bin/fusermount from install of ossfs-1.80.3-1.x86_64 conflicts with file from package fuse-2.8.3-5.el6.x86_64
   file /usr/bin/ulockmgr_server from install of ossfs-1.80.3-1.x86_64 conflicts with file from package fuse-2.8.3-5.el6.x86_64

Error Summary
可以从错误中看出,即将安装的 ossfs 和之前的 fuse 冲突了,需要卸载掉 fuse 之后再重新安装ossfs。
yum remove fuse
重新运行安装命令,即可安装成功,安装成功提示:
Installed:
   ossfs.x86_64 0:1.80.3-1

Complete!
挂载
将 test 这个 bucket 挂载到 /mnt/ossfs 目录下,AccessKeyId 是111111,AccessKeySecret 是666666(不知道怎么找的可以到这里传送门获取你的AK/SK),oss endpoint 是 http://oss-cn-hangzhou.aliyuncs.com,示例如下:
//设置bucket name 和 AccessKeyId/Secret信息
//将其存放在/etc/passwd-ossfs 文件中
//注意这个文件的权限必须正确设置,建议设为640。
echo  test:111111:666666 > /etc/passwd-ossfs
chmod  640  /etc/passwd-ossfs
//新建要挂载的目录
mkdir  /mnt/ossfs
//将OSS bucket mount到指定目录。
ossfs  sunmi-test  /mnt/ossfs  -ourl=http://oss-cn-hangzhou.aliyuncs.com -o allow_other
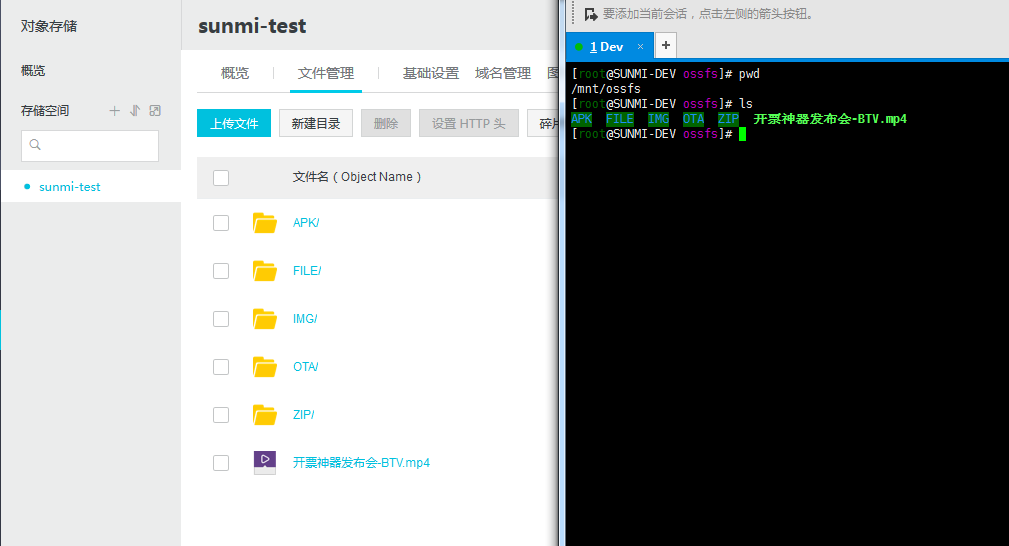
挂载效果如图所示:
卸载
卸载bucket:umount /mnt/ossfs
如果卸载 umount /mnt/ossfs 失败了,提示:
umount: /mnt/ossfs: device is busy.
        (In some cases useful info about processes that use
        the device is found by lsof(8) or fuser(1))
在后面加上 -f, umount /mnt/ossfs -f 强制卸载也不行,没办法,出绝招啦!先查看占用进程的pid:
fuser -m /mnt/ossfs
    /mnt/ossfs:      18068c     18616c     19722     19768c
ps aux | grep 18068 可以查看某一个 pid 的具体情况:
root     18068  0.0  0.0 108700  2280 pts/4    Ss   14:53   0:00 -bash
root     20668  0.0  0.0 103328   996 pts/9    S+   15:11   0:00 grep --color 18068
杀进程!杀进程!有两种方法,一种是: fuser -m -k /mnt/ossfs,另外一种是一个一个杀: kill -9 18068 18616
这个时候再去卸载 umount /mnt/ossfs 即可成功啦!
建立软连接
建立连接有 mount --bind 和 ln -s(注意:是ln 不是 In),一个是硬连接,一个是软连接,mount --bind和目录硬链接都会造成循环的目录架构,所以这里选择ln -s,将 OTA 目录单独连接出来
ln -s /mnt/ossfs/OTA/ /mnt/oss-ota/
删除软连接:rm -rf /mnt/oss-ota 注意加 / 就是删除 oss-ota 这个文件夹,不加 / 就是删除软连接
开机挂载
vi /etc/rc.d/rc.local

# 开机挂载oss,采用此种方式挂载避免修改/etc/fstab ,导致挂载失败而系统无法启动。
# 加 -o allow_other 允许非root用户操作避免因权限问题导致无法操作oss目录
ossfs test /mnt/ossfs -ourl=http://oss-cn-hangzhou.aliyuncs.com -o allow_other

